There are multiple ways you can add an external JAR into the classpath of a Java project in Eclipse, but all goes via adding them into the build path. Many beginners struggle to add JARs into classpath and we will try to address that problem in this tutorial. You will learn step by step tutorial to add an internal or third-party JAR in your application's CLASSPATH in Eclipse Indigo. Since this feature has hardly changed in any Eclipse version, you can follow some steps in Eclipse Kepler, Indigo, and Juno versions to add JARs into the classpath.
Since Eclipse is the most popular Java IDE and used by many companies, it's important for a Java developer to know Eclipse in and out. It will not only help to work better but also create a better impression among your teammates.
Btw, if you are new to this blog, then don't forget to check out my earlier Eclipse articles e.g. 30 useful Eclipse shortcuts for Java developers (see here) and 10 tips to debug Java programs in Eclipse (see here), very useful to increase your productivity in Eclipse.
If you are super excited to master Eclipse IDE, you can even check out a course like Eclipse Tutorials for Beginners on Udemy for a more comprehensive study on Eclipse's features and tricks.
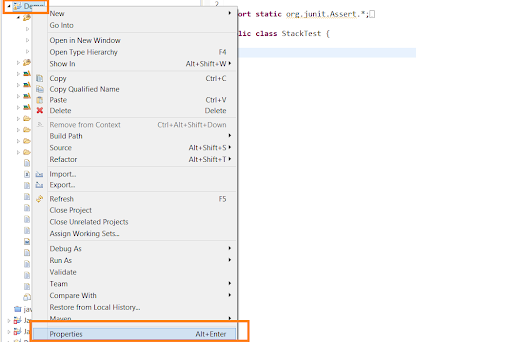
1) Right-click on your Java project and select Properties, as shown below :
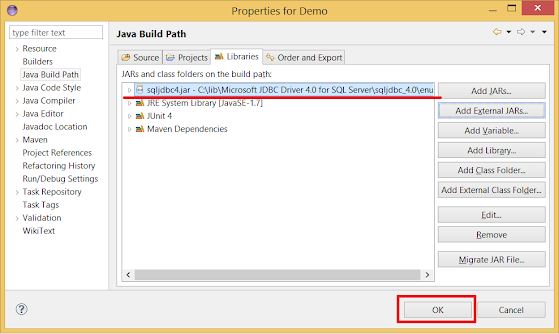
3) Choose Java Build Path and Select Third tab, Libraries

6) Alternatively, Click Add External JAR to add JAR from any folder on your machine. It will open the file chooser to choose the JAR file from the file system and add that into CLASSPATH.

Once you click Open, the JAR will be shown in your project's build path as shown below :
8) Once you add JAR, you can see them in same Library window. You can remove them by selecting and clicking Remove button.

5) Click Add JAR to add JAR from any other project in the same Eclipse workspace. It will open a selection window to choose the JAR file from the existing Eclipse project and add that into your application's classpath.
7) If the automatic build is not set then make sure you refresh your project and build it again.
That's all about how to add/remove JAR files into your project's classpath in Eclipse. If you are using Maven with Eclipse e.g. via the M2Eclipse plugin then you don't need to do this exercise, as Maven dependencies are always in the build path. You just need to add the new library to the pom.xml and Maven will download and add into Maven dependency automatically.
Further Learning
Beginners Eclipse Java IDE Training Course
Eclipse Debugging Techniques And Tricks
The Eclipse Guided Tour - Part 1 and 2
Other Eclipse tutorials and tips for Java Programmers
Since Eclipse is the most popular Java IDE and used by many companies, it's important for a Java developer to know Eclipse in and out. It will not only help to work better but also create a better impression among your teammates.
Btw, if you are new to this blog, then don't forget to check out my earlier Eclipse articles e.g. 30 useful Eclipse shortcuts for Java developers (see here) and 10 tips to debug Java programs in Eclipse (see here), very useful to increase your productivity in Eclipse.
If you are super excited to master Eclipse IDE, you can even check out a course like Eclipse Tutorials for Beginners on Udemy for a more comprehensive study on Eclipse's features and tricks.
Steps to add external JARs into Eclipse Project's classpath
Here is the step by step guide to add external JAR files into a Java project's classpath into Eclipse IDE:1) Right-click on your Java project and select Properties, as shown below :
3) Choose Java Build Path and Select Third tab, Libraries
6) Alternatively, Click Add External JAR to add JAR from any folder on your machine. It will open the file chooser to choose the JAR file from the file system and add that into CLASSPATH.
Once you click Open, the JAR will be shown in your project's build path as shown below :
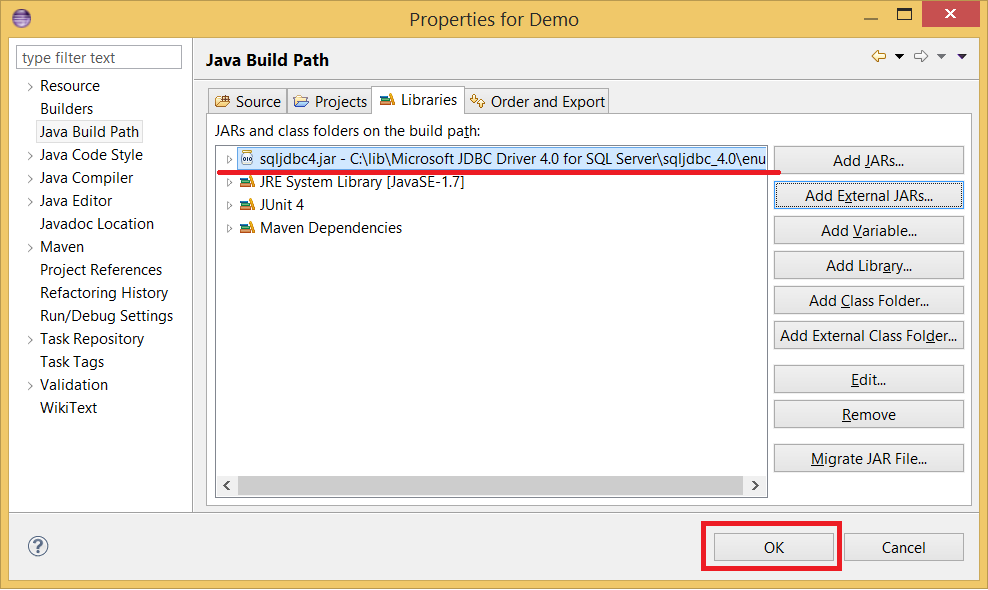
8) Once you add JAR, you can see them in same Library window. You can remove them by selecting and clicking Remove button.
5) Click Add JAR to add JAR from any other project in the same Eclipse workspace. It will open a selection window to choose the JAR file from the existing Eclipse project and add that into your application's classpath.
7) If the automatic build is not set then make sure you refresh your project and build it again.
That's all about how to add/remove JAR files into your project's classpath in Eclipse. If you are using Maven with Eclipse e.g. via the M2Eclipse plugin then you don't need to do this exercise, as Maven dependencies are always in the build path. You just need to add the new library to the pom.xml and Maven will download and add into Maven dependency automatically.
Further Learning
Beginners Eclipse Java IDE Training Course
Eclipse Debugging Techniques And Tricks
The Eclipse Guided Tour - Part 1 and 2
Other Eclipse tutorials and tips for Java Programmers
- How to attach the source code for the JAR file in Eclipse? (guide)
- Eclipse short to print System.out.println statements? (shortcut)
- How to remove debug Java program in Eclipse? (guide)
- How to increase the console buffer size in Eclipse? (steps)
- How to fix the Maven repository search not working in Eclipse? (solution)
- How to use spaces instead of tabs in Eclipse? (guide)
No comments :
Post a Comment